Adding an Addition to a Manufactured Home

A few years ago, our sun room collasped in the middle of the winter.. I wrote about that experience Here...
We were left with the decision of what to do now.. Should we build another sunroom, just use the deck it sat on as a deck or add a new room?
Our insurance company gave us the names of a few builders in our area they had worked with and the first one we called came over to look the situation.
He asked how much we wanted to invest, and what we'd really like there.. The insurance was paying for some of the rebuild, but we weren't in a position to put a lot of our own money into it, so he went to work and came up with a plan.
He suggested he could build the frame, roof it and side it, and we could redo the inside ourselves, putting as much time and money into it as we could afford..
I think it was just our good fortune that this happened in the winter when they didn't have a lot of work going on, so he was willing to take on our little project as a way to give his employees some needed work..
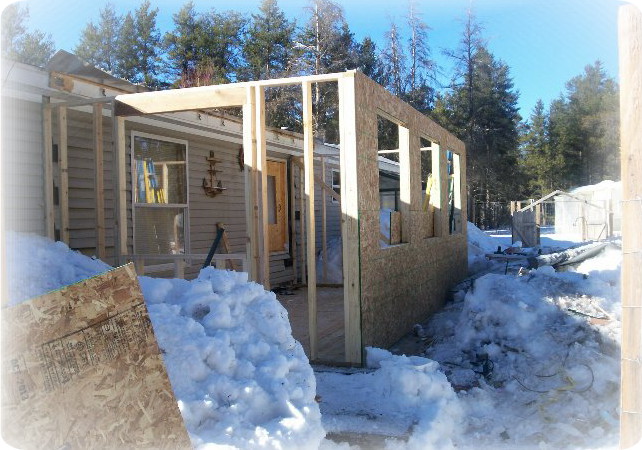
They tore down the sunroom and removed everything from the room, which wasn't an easy task considering all the snow!

This is a picture of what the deck looked like when we built it. Luckily, we had put in 42" footers because of the cold temps here in Northern Michigan, so the builders decided it was a good base for them to build on.

It was amazing how fast the walls went up once they'd cleared all the sunroom debris away..

The next day the roof went up.. This was the noisest day they were here.. It sounded like the roof was going to cave in, but by the end of the day, we had a roof.


This is what it looked like from the inside at this point.

The nexxt day they inserted windows and the doors.

Then the siding went up along with the roof shingles on top of an ice protective layer.

Their job was complete, and it was time for us to get started on the inside.

We decided to go with tongue and groove for the walls and the ceiling... We got a lot of advice from our sons, home depot and the construction company.
We insulated all the walls with rolls of R19 kraft faced insulation purchased at Home Depot.
The tongue and groove was actually pretty easy to put up once the insulation was in place using a cordless nailer.
There was a leak in the ceiling, which took forever to get the builder to take care of.. That was really the only complaint we had about this whole process.. We had to hold off finishing the ceiling until they finally fixed it..
Once it was fixed, we first installed thin insulation board as a vapor shield, then inserted R30 unfaced insulation. A sales person recommended insulation supports, which are just wires you use to hold the insulation in place.. Very inexpensive but made it so much easier to do!
Once that was done we added the tongue and groove boards to the ceiling, then my husband made the window frames himself out of pine..
After that was all done, we stained the walls and ceiling with MinWax Poly Stain in Golden Oak.
We then had to deal with the floor. One of our sons is a carpenter in the South, and on his advice, we first laid a bead of silicone around the bottom of the walls to seal any possible leaks, used liquid nails between all deck boards to seal any air leaks, topped that with a layer of tar paper, topped that with a layer of pink insulation board, topped that with strand board, which I painted, then topped with vinyl tiles and completed it with a room sized carpet.
We added a ceiling fan and an outdoor light, and we were finally ready to add furniture and enjoy.


We thought this would probably be a 3 season room, but then started considering a pellet stove after one of our sons installed one and really liked the way it heated their home.
We ended up buying a King Pellet stove from tractor supply and having it installed by someone local who is a professional, although, lots of people install them on their own.
There was a bit of a learning curve to start off, but once we got it figured out, we have totally enjoyed this thing to the max! It heats the entire house for about 1/3 what we used to pay for heating/electricity. We buy our pellets from a local pellet factory, so we are able to save even more on the price. We heated the house last year for $600, which is something for Northern Michigan, especially considering the frigid cold temps we saw in 2014!

All in all, having a sunroom come crashing down in the middle of the night was not fun, but we have ended up with a room we love that made it possible for us to add a new heating source to our house..
Sometimes the worst things that happen turn out to be a blessing in disguise!
They tore down the sunroom and removed everything from the room, which wasn't an easy task considering all the snow!



This is what it looked like from the inside at this point.

The nexxt day they inserted windows and the doors.

Then the siding went up along with the roof shingles on top of an ice protective layer.

Their job was complete, and it was time for us to get started on the inside.

We decided to go with tongue and groove for the walls and the ceiling... We got a lot of advice from our sons, home depot and the construction company.
We insulated all the walls with rolls of R19 kraft faced insulation purchased at Home Depot.
The tongue and groove was actually pretty easy to put up once the insulation was in place using a cordless nailer.
There was a leak in the ceiling, which took forever to get the builder to take care of.. That was really the only complaint we had about this whole process.. We had to hold off finishing the ceiling until they finally fixed it..
Once it was fixed, we first installed thin insulation board as a vapor shield, then inserted R30 unfaced insulation. A sales person recommended insulation supports, which are just wires you use to hold the insulation in place.. Very inexpensive but made it so much easier to do!
Once that was done we added the tongue and groove boards to the ceiling, then my husband made the window frames himself out of pine..
After that was all done, we stained the walls and ceiling with MinWax Poly Stain in Golden Oak.
We then had to deal with the floor. One of our sons is a carpenter in the South, and on his advice, we first laid a bead of silicone around the bottom of the walls to seal any possible leaks, used liquid nails between all deck boards to seal any air leaks, topped that with a layer of tar paper, topped that with a layer of pink insulation board, topped that with strand board, which I painted, then topped with vinyl tiles and completed it with a room sized carpet.
We added a ceiling fan and an outdoor light, and we were finally ready to add furniture and enjoy.


We thought this would probably be a 3 season room, but then started considering a pellet stove after one of our sons installed one and really liked the way it heated their home.
We ended up buying a King Pellet stove from tractor supply and having it installed by someone local who is a professional, although, lots of people install them on their own.
There was a bit of a learning curve to start off, but once we got it figured out, we have totally enjoyed this thing to the max! It heats the entire house for about 1/3 what we used to pay for heating/electricity. We buy our pellets from a local pellet factory, so we are able to save even more on the price. We heated the house last year for $600, which is something for Northern Michigan, especially considering the frigid cold temps we saw in 2014!

All in all, having a sunroom come crashing down in the middle of the night was not fun, but we have ended up with a room we love that made it possible for us to add a new heating source to our house..
Sometimes the worst things that happen turn out to be a blessing in disguise!


.jpg)


.jpg)


.jpg)
.jpg)
.jpg)
.jpg)
.jpg)
.jpg)
.jpg)


.jpg)